Adobe Generator: Best Thing Since Sliced GIFs

We don’t usually discuss specific products on the blog, but a new feature of Adobe Photoshop CC called Generator has our team talking. Starting with version 14.1, Photoshop allows developers to directly export layers as graphic assets without having to slice, hide, nudge, copy or paste.
Here at Hanson, our visual designers produce beautiful mockups in Photoshop, and those mockups are composed of dozens or hundreds of individual layers. The job of our front-end developers is to take small details like icons, bullets, and backgrounds, and export them to image files that we can use in our stylesheets and HTML markup. For the last 15 years, our preferred solution was to add “slices” to Photoshop files, effectively drawing boxes around the layers we wanted to export.
Getting the slices right meant hiding some layers and showing others. If we needed one layer in multiple sizes (a common requirement with responsive design) we had to duplicate it, scale it, and move it from its normal position to some empty corner to be sliced.
All that layer manipulation can mangle a Photoshop file, so our best practice was to create a copy of the original, or to extract all the assets into a separate file which was then sliced. Neither of those was a very good option, so I’m happy to announce that with Adobe Generator, the future is here.
The concept of Generator is gloriously simple. By naming your layers and groups, you can export graphics in the format, quality, and even size of your choice.
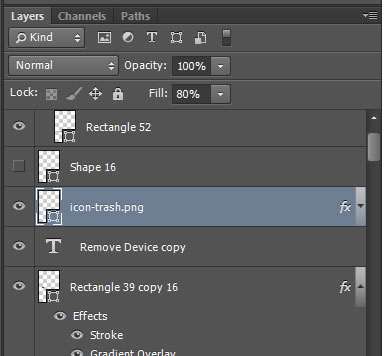
All I have to do is add a filetype extension to my layer name, such as icon-trash.png. Now I just go to the File menu and select Generate → Image Assets, and presto, the PNG file appears in a folder alongside my PSD.

The power of Generator doesn’t end there. I can export PNG, GIF, or JPG files, and I can set different qualities (such as .jpg60, .jpg70, .jpg80) and bit depths (.png8, .png24, .png32) depending on my needs. As long as the Generate → Image Assets checkbox is checked, Generator will output new assets every time the layer name changes.

I can also create multiple images from a single layer. In the example above I’m telling Generator to scale a vector layer to 200% and export it as icon-trash.png (for high-pixel-density screens), and then to export a copy at regular size as icon-trash_sd.png for everybody else.
These are just a few examples of why the front-end development team is so excited about Generator. We congratulate Adobe on the biggest game-changer in graphic asset production since the invention of the slice. For details about Generator and its other features, visit Adobe’s blog.
Credits: https://www.adobe.com/products/photoshop-lightroom.html